In this guide we will show possible ways of enabling SSL/TLS encryption with a trusted SSL certificate for incoming and outgoing connections on a typical Postfix-Dovecot mail server.
We have used a PositiveSSL certificate for testing; however, any certificate offered at ZTABOX is capable to secure the mail server of this type. Testing was performed on the following server stack:
- Ubuntu 16.04
- Postfix 3.1.0
- Dovecot 2.2.22
If you do not have an issued SSL certificate for your mail server hostname so far, feel free to purchase one, generate a CSR code and activate it.
When the certificate is issued, it can be downloaded from ZTABOX email or from the fulfillment email sent by the Certificate Authority to the certificate's administrative contact email address.
Uploading and concatenating certificate files on the server
- The certificate file yourdomainname.crt needs to be uploaded to the server along with a CA bundle which in its turn can be either in a single file (yourdomainname.ca-bundle) or in separate ones (COMODORSADomainValidationSecureServerCA.crt, COMODORSAAddTrustCA.crt, AddTrustExternalCARoot.crt as in our case). We have saved the certificate and CA bundle files in the /etc/ssl/certs/ directory and the corresponding private key (yourdomainname.key) in the /etc/ssl/private/ folder.
- Concatenate the uploaded files using one of the commands below:
- Create a file with the leaf (server) certificate and CA chain:- cat /etc/ssl/certs/yourdomainname.crt /etc/ssl/certs/yourdomainname.ca-bundle >> /etc/ssl/certs/certificate.crt
- cat /etc/ssl/certs/yourdomainname.crt /etc/ssl/certs/COMODORSADomainValidationSecureServerCA.crt /etc/ssl/certs/COMODORSAAddTrustCA.crt /etc/ssl/certs/AddTrustExternalCARoot.crt >> /etc/ssl/certs/certificate.crt
- Postfix and Dovecot can accept the certificate, CA chain and private key stored in a single file. Use one of the commands below to create it:- cat /etc/ssl/certs/yourdomainname.crt /etc/ssl/certs/yourdomainname.ca-bundle /etc/ssl/private/yourdomainname.key >> /etc/ssl/certs/certificate_and_key.crt
- cat /etc/ssl/certs/yourdomainname.crt /etc/ssl/certs/COMODORSADomainValidationSecureServerCA.crt /etc/ssl/certs/COMODORSAAddTrustCA.crt /etc/ssl/certs/AddTrustExternalCARoot.crt /etc/ssl/private/yourdomainname.key >> /etc/ssl/certs/certificate_and_key.crt
To check the content of the newly created file, run cat /etc/ssl/certs/certificate.crt or cat /etc/ssl/certs/certificate_and_key.crt. Make sure that the output does not contain excessive white spaces between or inside the PEM-encoded certificate and key blocks. If you spot the spaces, you can open the file in a text editor like 'vi' or 'nano' and remove them manually.
Editing Postfix and Dovecot configuration files to enable SSL/TLS on specific ports
Sending and receiving mail over the Internet relies on a complex system of endpoint and intermediary instances (mail server and client software) labeled as mail user agents (MUA), mail submission agents (MSA), mail transfer agents (MTA) and mail delivery agents (MDA) depending on the functions they perform. Normally, an email is passed over each type of the above mentioned parties, and different transport protocols are used on every step, namely submission protocol, Simple Mail Transfer Protocol (SMTP), Post Office Protocol (POP3) and Internet Message Access Protocol (IMAP).
The table below specifies the ports use for specific transport protocol execution.
| Protocol | Usage | Plain text/encrypted session | Encrypted session only |
|---|---|---|---|
| POP3 | Incoming mail | 110 | 995 |
| IMAP | Incoming mail | 143 | 993 |
| SMTP | Outgoing mail | 25 | 465 |
| Submission | Outgoing mail | 587 |
The possibility to use ports 25, 110, 143 and 587 either in the plain text (unencrypted) or secure (encrypted) mode comes from the Opportunistic TLS approach, according to which a STARTTLS command is invoked when an existing active plain text session is in place.
Technical side of using ports 465, 993 and 995 is similar to the way HTTP protocol is used over SSL/TLS: 1) secure ports are separated from their 'unsecured' counterparts; 2) establishing an encrypted session precedes any data exchange.
NOTE: Although port 465 is not officially standardized in IANA's documentation as the SMTPS port, it has been and is being used by mail server administrators for serving encrypted outgoing mail traffic.
In fact, both described techniques are commonly used in the Internet mail system nowadays, and a good security practice is to apply the SSL certificate on every mail port you are going to use.
Let's move on and enable the SSL certificate for incoming and outgoing mail ports.
Port 25 (SMTP with STARTTLS)
Open Postfix's main.cf configuration file for editing. It is usually stored in the /etc/postfix/ directory. Find TLS parameters section inside main.cf and change the values of certain directives as shown below:
- if the certificate and private key are saved in separate files:
smtpd_tls_cert_file=/etc/ssl/certs/certificate.crt
smtpd_tls_key_file=/etc/ssl/private/yourdomainname.key - if the certificate and private key are saved in a single file:
smtpd_tls_cert_file=/etc/ssl/certs/certificate_and_key.crt
smtpd_tls_key_file=$smtpd_tls_cert_file - make sure that smtpd_use_tls directive is set to yes:
smtpd_use_tls=yes
Close main.cf file with saving changes.

Ports 587 (Submission with STARTTLS) and 465 (SMTPS)
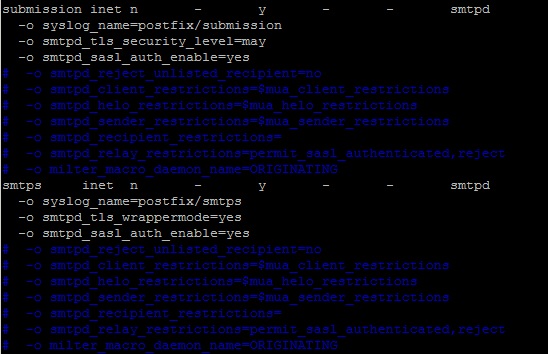
Open Postfix's master.cf file located in the /etc/postfix/ directory and uncomment (and edit as below if needed) the following lines:
- to open and secure port 587:
submission inet n - y - - smtpd
-o syslog_name=postfix/submission
-o smtpd_tls_security_level=may
-o smtpd_sasl_auth_enable=yes - to open and secure port 465:
smtps inet n - y - - smtpd
-o syslog_name=postfix/smtps
-o smtpd_tls_wrappermode=yes
-o smtpd_sasl_auth_enable=yes
Now the master.cf file can be closed.

Ports 110 (POP3 with STARTTLS), 143 (IMAP with STARTTLS), 993 (IMAPS) and 995 (POP3S)
To enable the SSL certificate for Dovecot, open the 10-ssl.conf file, which is usually located in the /etc/dovecot/conf.d/ directory, and edit the following lines:
- if the certificate and private key are saved in separate files:
ssl_cert = ssl_key = - if the certificate and private key are saved in a single file:
ssl_cert = ssl_key = - ssl directive should be set to yes:
ssl = yes
Now you can close the 10-ssl.conf file with saving changes. That's it. After applying the above mentioned changes the certificate is installed for all incoming ports.

If your Dovecot version is 1.x, the SSL directives in configuration files are slightly different:
- Make sure that /etc/dovecot/dovecot.conf has the following line:
protocols = imap pop3 imaps pop3s
- Edit the /etc/dovecot/conf.d/10-ssl.conf file as below:
ssl_disable = no
- if the certificate and private key are saved in separate files
ssl_cert_file = sl_key_file =- if the certificate and private key are saved in a single file
ssl_cert_file = sl_key_file =
Advanced tweaks
This section contains a brief description of some additional settings that will come in handy for finetuning your mail server's SSL/TLS handling. Feel free to read Postfix and Dovecot official documentation regarding this matter as well.
- It is possible to use a STARTTLS port on Postfix in the 'wrapper' mode with smtpd_tls_wrappermode directive, which implies initializing a secure connection from the very beginning instead of announcing STARTTLS support and waiting for a corresponding request from a remote client. The directive should be added to /etc/postfix/master.cf (see example below):
smtps inet n - n - - smtpd
-o smtpd_tls_wrappermode=yes - On Dovecot, it is possible to set ssl directive to required value (ssl=required), which implies forcing SSL handshake before any login attempt. Thus, the password will be sent over an encrypted channel only, while with ssl = yes email clients are not required to use SSL/TLS in precedence. This setting applies to both plaintext and non-plaintext authentication mechanisms.
- To disable the plaintext authentication mechanism, you can use disable_plaintext_auth directive (/etc/dovecot/conf.d/10-auth.conf):
disable_plaintext_auth=yes
- To eliminate the ciphers which are better not to be used due to low encryption strength, you can set the following directives on Dovecot (/etc/dovecot/dovecot.conf):
ssl_dh_parameters_length = 2048
ssl_cipher_list = ALL:!LOW:!SSLv2:!EXP:!aNULL - On Postfix the smtpd_tls_ciphers parameter controls the minimum cipher grade and is set to medium level by default, which is sufficient enough for providing robust security. Still, if you need to exclude certain ciphers or protocols for opportunistic (STARTTLS) or mandatory (regular SSL) encryption, use the following directives in /etc/postfix/main.cf and assign the corresponding values to them:
- for mandatory TLS
smtpd_tls_mandatory_exclude_ciphers = [cipher]
smtpd_tls_mandatory_protocols = ![protocol]- for opportunistic TLS
smtpd_tls_exclude_ciphers = [cipher]
smtpd_tls_protocols = ![protocol] - To prefer the server side cipher list over the client-side one, you can use these directives:
- on Dovecot (/etc/dovecot/conf.d/10-ssl.conf)
ssl_prefer_server_ciphers = yes- on Postfix (/etc/postfix/main.cf)
tls_preempt_cipherlist = yes
Checking SSL installation
Using OpenSSL
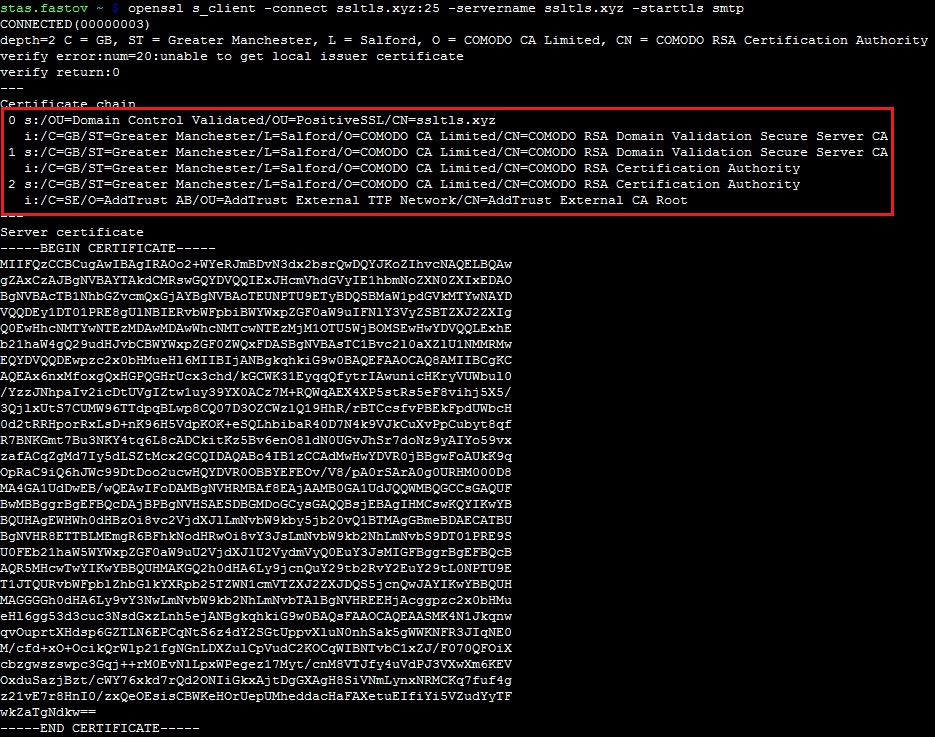
The OpenSSL toolkit allows checking SSL certificate installation on a server either remotely or locally. To check STARTTLS ports, run the following command replacing [port] with the port number and [protocol] with smtp, pop3 or imap value (see the example below) respectively:
openssl s_client -connect example.com:[port] -servername example.com -starttls [protocol]
The same command but without -starttls switch can be used for checking non-STARTTLS ports:
openssl s_client -connect example.com:[port] -servername example.com

Using online checkers
There is also a number of online tools which allow checking your mail server connectivity over SSL/TLS. You will need just to enter the server hostname and port number or an existing email account and run the test, which usually takes up to a few minutes. You can find the links to those testing tools below:
SSL-Tools
CheckTLS
MXToolbox
High-Tech Bridge
